Invoice project milestones
Milestone-based invoicing is designed for companies that deliver work in clearly defined phases. Instead of invoicing an entire service upfront or at the very end, businesses can bill customers progressively as each stage of work is completed. This approach provides customers clearer visibility into progress and value delivered over time.
In Axis, milestone invoicing is configured at the product level in the Sales app, with milestone progress and completion managed in the Projects app. When a milestone is marked as reached, the delivered quantity on the sales order (SO) is updated and can be invoiced.
How milestone invoicing works
Milestone invoicing follows a clear workflow involving multiple applications in Axis:
A product is created in the Sales application, configured to be invoiced based on milestones.
A SO is created with the product.
A project in the Projects app is created with multiple milestones included.
A milestone is reached, and marked complete, causing the Delivered quantity on the SO line to update.
An invoice is created for the completed milestone, which can be sent to the customer.
Important
This document covers the Sales app configuration and invoicing flow for invoicing based on project milestones. For more information on creating, managing, and marking milestones as complete, and how to link them to tasks, see Project milestones.
Create milestone products
To begin, a service product must be configured specifically for milestone-based invoicing. Navigate to and click New. Enter the necessary information, including the product title and Sales Price.
For the Product Type, select Service. Doing so reveals the Create on Order field. Select either Project, Project and Task, or Task, depending on how the product is to be tracked in the Project app.
Note
A Project Template can also be selected for the product. See Project templates for more information. Project templates can have milestones defined, however, the Quantity (%) field must be manually updated on each newly created project.
For the Invoicing Policy, select Based on Milestones. This option ensures that the product’s delivered quantities update automatically once a milestone is completed.
Important
Based on Milestones is only available if there is at least one project with Milestones enabled.
Defining milestones
Note
This document focuses on the process of selling and invoicing a milestone product in the Sales app. For more information on creating milestones in the Project app, see Project milestones.
After the milestone product has been sold, a Milestones smart button is added to the SO. Click the smart button to view, edit, or create new milestones.
From here, the Delivered % can be altered. This amount equates to the total cost of the SO that is billed when the milestone is reached.
Example
A company that provides pool installation services bills based on predefined milestones as the work is completed. Each milestone equates to 25% of the total services:
Site Preparation & Excavation
Structural Installation
Plumbing & Equipment Installation
Finishing & Final Inspection
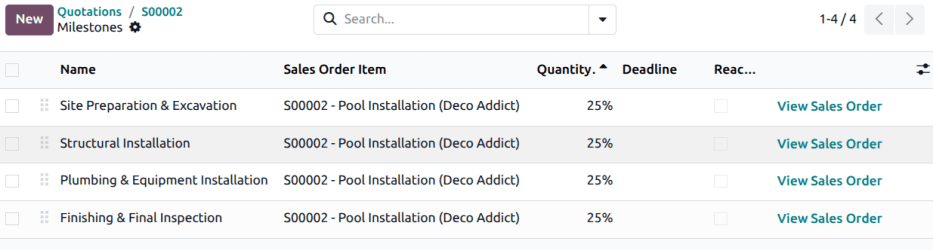
The team uses a project template, called Pool installation, with these milestones defined. A new project is created whenever a SO with the Pool installation services product is confirmed.
Invoicing a completed milestone
Milestones can be tracked through the Project app (see Using milestones). Additionally, a milestone can be marked complete by navigating to the SO, and clicking the Milestones smart button. On the Milestones page, enable the checkbox in the Reached column for the milestone.
Then, click View Sales Order or use the breadcrumbs to return to the SO. The Delivered column will be updated to reflect the Delivered % for the milestone reached.
These steps can be repeated as additional milestones are reached until the SO has been fulfilled.
Important
Reaching a milestone does not automatically create an invoice. Instead, it updates the SO to reflect the amount of the total that is ready for invoicing.
Once one or more milestones have been reached, navigate to the SO, and confirm the Delivered column has updated correctly. Then, click Create Invoice.
Additional milestones can be invoiced as they are completed, until all services are complete.