Scrap inventory
Sometimes, products in a company’s warehouse stock might be found to be damaged or defective, past the point of being reparable. If it is not possible to repair the product, or return the product to a vendor, it can be scrapped.
Axis Inventory allows users to scrap inventory, designating goods or materials that are no longer usable or sellable for disposal (or recycling).
Scrapping inventory in a database helps stock counts remain accurate by removing scrapped products from physical inventory and placing them in a virtual Inventory Loss location.
Note
Virtual locations in Axis are not real, physical spaces in a warehouse. Rather, they are designated locations in a database that provide tracking of items that shouldn’t be counted in a physical inventory.
For more information about virtual locations, see the documentation about the different types of location types.
Create a scrap location
By default, scrap operations are recorded in the Inventory adjustment virtual location. However, if the scrapped products need to be recorded in the Profit and Loss accounting report, it is possible to create an Inventory Loss location specifically for tracking scrapped goods. If scrapped goods don’t need to be tracked for reporting purposes, create a scrap order from stock.
To create a new Inventory Loss location specifically for scrapped goods, first, open . In the Warehouse section, enable Storage Locations. Be sure to click Save.
To create a new scrap location, open . By default, this list is filtered by Internal locations. To see all locations, remove the Internal filter. Click the New button to create a new location.
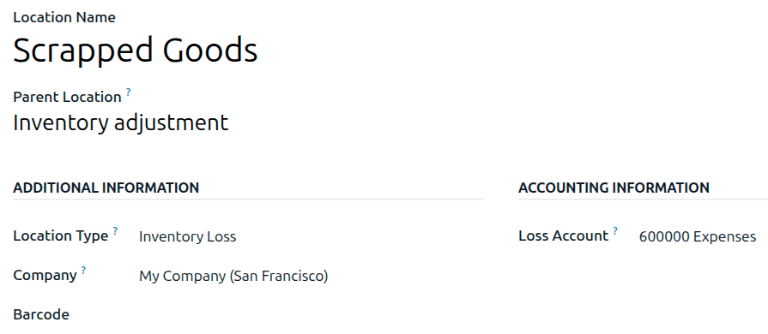
The location form opens. Specify a Location Name and Parent Location. Update the Location Type to Inventory Loss. If working in a multi-company database, specify a Company. Optionally, specify a Loss Account to ensure that products scrapped to this location show up in the Profit and Loss accounting report.
Example
A company creates a new Scrapped Goods location, with the parent location being Inventory
adjustment. The Location Type is set to Inventory Loss. To ensure the
scrapped products show up in the Profit and Loss accounting report, they specify 600000
Expenses as the Loss Account.
See also
Scrap from stock
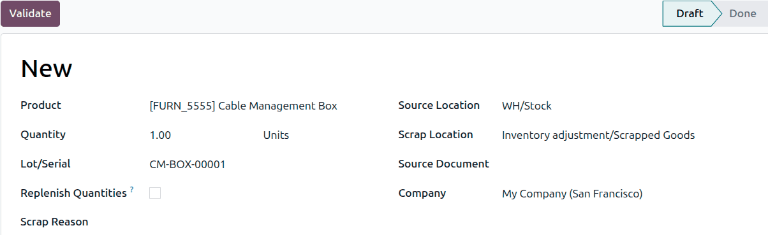
To create a new scrap order (SP) for an in-stock product, navigate to , and click New. This opens a new SP form.
Click the drop-down menu in the Product field, and select the product that should be
scrapped from inventory. In the Quantity field, change the value to the quantity of the
product that should be scrapped (by default, this value is set to 1.00).
The Source Location defaults to the location where the product is currently stored. The Scrap Location defaults to Inventory adjustment. Either of these locations can be changed by selecting a different location from their respective drop-down menus.
If the scrapping is tied to a specific existing operation, specify the operation in the Source Document field.
The Company field displays the company whose warehouse this product belongs to. If a replenishment rule is set up for the product being scrapped, and if the product should be replenished, select the checkbox for Replenish Quantities.
Optionally specify a Scrap Reason.
Once ready, click Validate to complete the new SP.
Once validated, a Product Moves smart button appears at the top of the form. Click the smart button to view the details of the scrap operation.
Tip
To view the all-time total quantities of scrapped items, navigate to . A list of all scrapped products, and their quantities, is displayed.

Scrap from an existing operation
Scrap orders (SPs) can also be created from existing operations, such as receipts, delivery orders, and internal transfers, before they are entered into, or removed from, stock for an operation.
To scrap a product during an operation, navigate to the . From the Inventory Overview, click the # To Process button on an operation’s task card (i.e. the Receipts task card).
Then, select an operation to process from the resulting list of existing orders. Doing so opens that operation’s form.
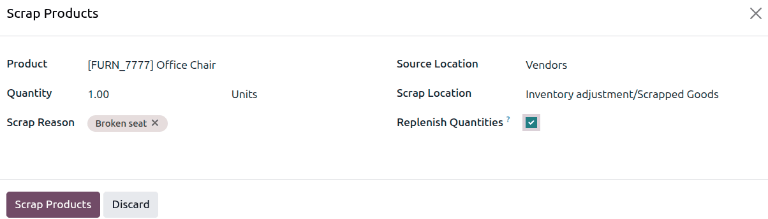
Click the (Actions) icon, and select Scrap from the resulting drop-down menu. This opens a Scrap Products pop-up window.
From this pop-up window, click the drop-down menu in the Product field, and select the products from the operation that should be scrapped. Adjust the value in the Quantity field, if necessary. Optionally specify a Scrap Reason.
If the Product selected is tracked using a lot or serial number, a Lot/Serial field appears. Specify the tracking number in that field.
The Source Location and Scrap Location can be changed, if needed. If a replenishment rule is set up for the product being scrapped, and if the product should be replenished, select the checkbox for Replenish Quantities.
Once ready, click Scrap Products.
After products have been scrapped from an operation, a Scraps smart button appears at the top of the operation form. Click this smart button to view the details of all scrap orders created from this specific operation.